Soldered keyed guard -- will this work?

Joined
May 31, 2020
Messages
67
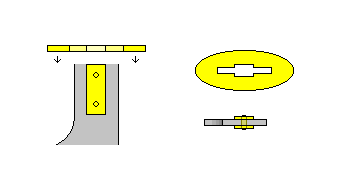
I'm hoping to fix a guard on this blade so it won't move. I've made one for the tang as-is:
AVvXsEj8JdgTukP2W8R_cwhpp6_ok7rGGkij1Jz8nEBCHAdVngVZuo7flmKFIhEo9Sn0GDfiqMtzH_JVvJNZSWopu8mQC7ej_5Hca815-eHtrO3m1QIG3CsPoO87qfd7oCbocdvG_dtO0bK34tXUis5b1J_VB7IunddUjspHNIE72bAP_CcB-x5oDI2WGDoa=s1200


As you can see, the tang is awfully narrow for the usual solution of having the width step down from the blade to the tang, plus I'd have to make the pommel bulge (?) narrower as well. Also, this is a stainless blade, so I understand a special solder would be required to attach the brass directly to the steel.

I had the thought of filing small slots into the sides of the tang, fitting small brass blocks into them, and silver-soldering the guard to the blocks to lock it into place.
AVvXsEiR9FYHZGOd-Y9aJF9eyQ6ED23QmdH_OrldrgEZAf8-MSBoosDW_OFpVtXI6ytWa_AEiJcBp2XLdD5lPi4k5BH8lFUm8ZifM3gcXf-RXIrD-8f0Pm-L4sLRY3wtu6o6WN9rf13LOWKUz-s0dceeVjBqBJp-xIMvhkgKDJgG83bHpnoMo1WP3lqSF2nI=s495


Approximately how stupid is this? Will the keyholes create much of a weak point in the tang? Would making them semicircular instead of square help reduce that? And are tiny keys not enough of a connection to keep the guard from breaking loose? You folks are great at pointing out more obvious solutions that I overlooked -- is there one here?

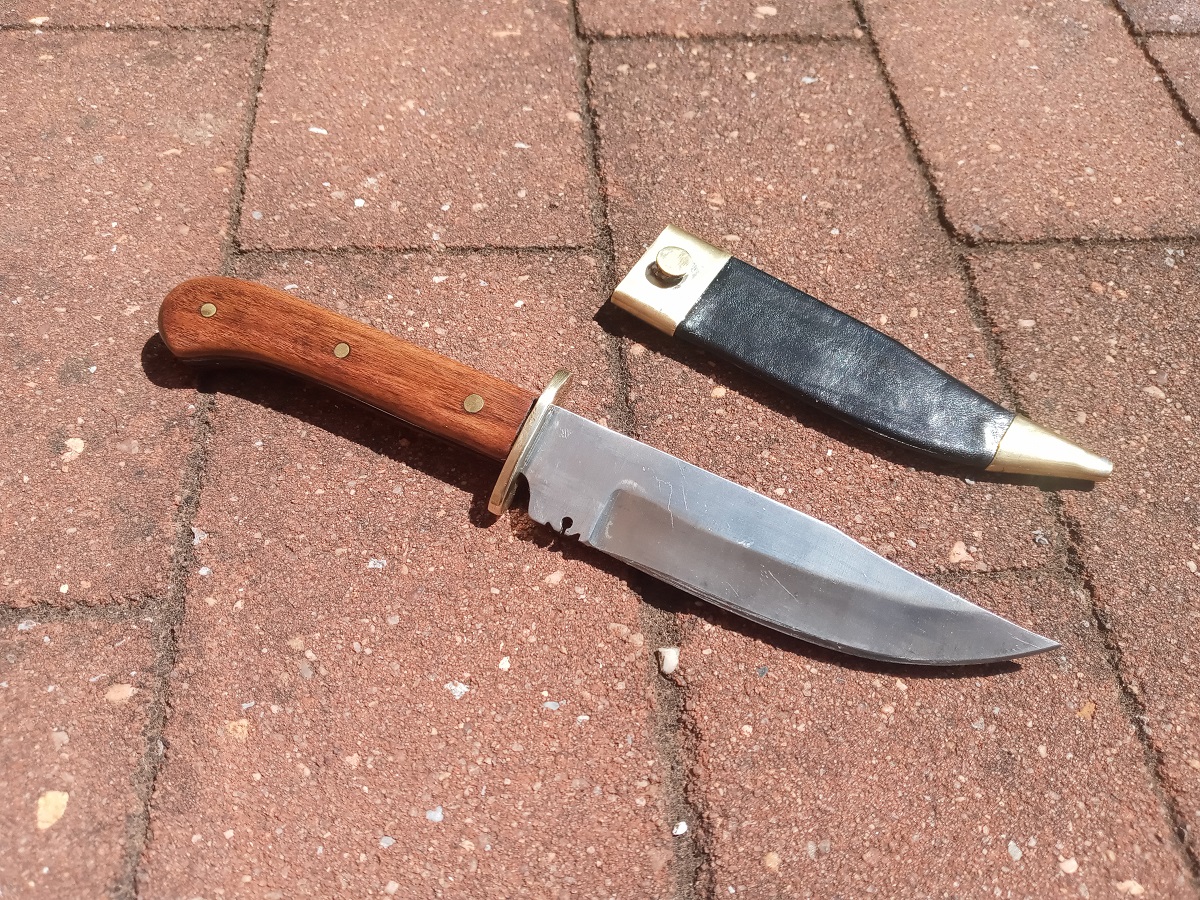
I realize the substantial shoulder means a guard isn't absolutely necessary, but I'd like to make it look like an old Sheffield Bowie, and they seem to always have two-branch guards. I also realize they usually had symmetrical tangs, but I've seen at least one or two examples that had similar beaked pommel profiles.

Thanks for any suggestions.
 
I don't know what you're going to use the knife for, but those squared slots in the tang would become "stress risers", a weak point in the knife that could increase the chances of breakage.

Making the slots concave (semi-circular) would reduce the chance of breakage over squared slots, but they would still create a weak point.

I have a guy I go to when I need welding done, and he told me that in order to get a good connection with stainless steel that the parts need to be very flush.

For what you want to do, the positioning of the guard, I would consider the following-

With the guard installed, pin a section of brass bar to each side of the tang (this would require at least two small holes to be drilled through the middle section of the tang). Use a piece of bar that is narrower than the tang and maybe 3/16ths" thick. Then solder the guard to the ends of each bar. This would require a slot to be cut in the underside of the handle scales to accommodate the brass bars.
 
Last edited:
And more solder joints are more opportunities for joint failure (at least the way I solder).

What I’d do is, make a U shaped guard with a perfectly vertical inside channel, but a semicircular short end to fit the semicircular front notch, slide it onto the tang, and insert a back plug to fit the semicircular back notch. Then solder the plug to the guard parallel to the long dimension of the tang.

That’s confusing to describe, but I think more solder area would give a stronger joint, and load it in shear rather than tensile.

Nice looking blade.

Parker
 
Thank you for the suggestions. Okay, so if I understand them, they would be:

AVvXsEj6D6aXey1qCFd_yxwadsrl5gb-GfG7l9RO-EXX2igxCMNLlBQetlEIk7KapL7Ov42U8K8direhH89KtHGIN9P75X89BezB1IPfCSS_9GdjiURfETiZHUf5ePyJIu_laLtT4ixLPy-r6nT_sIX0Cw6u71TdIAMP2B7PKiZ16JFjHYOcIzU88ywMsOKB=s348


AVvXsEi4hMbkf8uXD8evAMGge9AKulvhdi5J-VdPs_0r74CDkxtfDHBxiTt9EQB4seVnsb5QfaR6XqnvoQeT6DGjKNnvUeXFzyF8-sRTErUaqKnBg31fC45UbGx_hberY0uZIJlzzqY0P5Ul1jdaQqUjabTy2dIJJaJaogVSQoWI08Kk_IIJ-3AfOr6uPtZK=s495


Am I getting this right?
 
My suggestion was for using the guard pictured as is, no extra slots in the guard to pass over the bars. Instead, the guard goes on first, then the bars are pinned to the tang behind the guard, and the guard butts right up against the ends of the bars for soldering.

Depending on how thick you plan to make the handle scales, it might be possible to use thicker brass bars. The thicker and wider the bars are, and the more brass to brass contact there is,, the stronger the soldered joints will be.

It does look to me like the version you drew would also work,.
 
Last edited:
what about epoxy under the guard instead of soldering....
and drilling the guard through the front, and pinning/epoxing it into the handle, (from the front) which will also be pinned and epoxied through the tang.
 
you may want to test if you can even solder to that stainless. many grades are notorious for not being able to take solder. type of flux is critical too. copper plumbing flux probably won't do. you may need something like Zinc Chloride, Ammonium Chloride or Hydrochloric Acid based flux. some contain a blend of these

if you can't solder it then I would just figure out a method of epoxy as mentioned above.
 
It's done! I went with a modification of killgar's idea. Feels pretty solid. Thank you all for your advice.

I'd like to trouble you for one more opinion, if that's alright:
AVvXsEgvGOVhF0-s9rftJ7G7_J4D9pGQ_lN_NMN25JOuMtZKgkY5tQU5hB2SPJGor-PMz138_WcCV4gzgzBO07yaQzenvUg8pWzOHamAEM3PRz55UNDmLylQeCA0ekM79jN8E-XJZGdyyuomLn2yQd4y9jIlIhxrrD0rYXwLtATQ7NRZRG5Xj7yJjwHR1ak6=s1200


Cherry or curly maple scales? AFAIK a real imported 19th-century Bowie would have stag, bone, horn, or an exotic hardwood, but this is what I've got on-hand.
 
I don't see a lot of figure in that piece of maple so I vote cherry.

But in reality either one should make a fine handle.

O.B.
 
I think it has more figure than shows up in the photo, but on reflection I'm also inclined toward the cherry. Something about curly wood doesn't seem right here... dunno why. Anyway, I'll get to work on them. Thanks again!
 
I think if you dampen the maple with some paint thinner, it’ll show more figure. It’ll show up when you apply finish.

Pretty knife either way, I doubt you can go wrong there. Cherry will finish out darker, unless you stain or dye the maple.

Parker
 
Finally got around to finishing this one! I went with cherry but it didn't look dark enough, so I stained it with Minwax mahogany (though I really wish I'd been more careful about removing the original scales so I could've reused them). It's finished with Tru-Oil and the scabbard has a modern dye and finish because I've never managed to neutralize vinegaroon so it won't rust the steel.

boot%20bowie.jpg

Unfortunately the blade got a bit scratched up.

Here it is next to an unmodified original:
comparison.jpg

With the guard in place there's only just enough room left for my medium-sized hands to hold it. The current problem now is the sheath is tight in the ricasso; it seemed okay before I glued the throat on but now I can't draw it just by pushing against the frog button with my thumb. I'm thinking I'll dampen the leather in the throat and push a polished 1 x 1/8-inch brass bar in to stretch it out.

Thanks again for all the advice on this project!
 
Yep, having a straight back just didn't seem right.

I managed to loosen the sheath sufficiently by dampening the leather under the throat and then rubbing the Spanish notch against the inside to grind/burnish it down. Luckily that was the only place it was too tight.
 
Back
Top