How To Grinding woes

I agree with FredyCro FredyCro , you should finish every knife you make, or at least close to every one, when you're a beginner at least.

Even if you screw up every aspect of knife making, from forging to finishing, on a knife, it's still going to teach you something at every step.

As you go along you're also going to learn to tell what you can and can't can't fix at your current skill level.

I consider myself to be an amateur, at best, but I have learned what I can and can't fix at my current skill level, and I've got several knives that I knew I wouldn't be able to fix and so I've seen them aside until I get better, because I know they are fixable.

Fix it, or finish it as is, both will teach you things!

If you toss it, it'll only teach you what you've learned this far! Wring everything you can outta that steel before you toss it aside!
 
wrt grinding woes in general; I figured out today that when I use my radius platen, a 36 grit belt makes for a bigger radius and that successively higher grits are too small to fit perfectly in the hollow left by the 36 grit belt. I've done maybe 6-8 knives now with hollow grinds and this is the first time I noticed there was a problem, and so I was able to figure out how to keep it from happening. The quality of my work is automatically going to improve now that I noticed the problem and figured out why.

there are a lot of variables when it comes to learning how to use a grinder, so for me at least, it's important to be patient with myself and use all the little annoying experiences as moments to reflect on. Knife making- the way a lot of people do it- involves a lot of problem solving.
 
Hi Henglo, it needs a thump on the spine , it's only three finger. do you mean just the blade part?
Yes leave the dpine square where the scales go and round the spine at the blade part. It looks better and will be more comfortable.
That's what makes it custom
 
Good Morning.

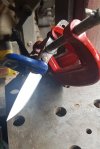
I needed/wanted a neck knife, and some time ago decided to try and make myself one. I wasn't at all happy with it at the time, my grinding left a lot to be desired. Anyhow, I think I am getting a bit better and still want a neck Knife so decided to have another bash at it. It has gone a lot better this time around but i have got myself into another mess, It was that bad before that now correcting it the spine has a step in it.

It hardened 80CRV2 and i don't have a surface grinder, any thoughts on correcting it or should I chuck it back on the bench for a bit.

View attachment 2370092

View attachment 2370093
You grind *free hand * ?
 
I have a jig, and a shoulder jig I made, the repair was freehand. well its not a jig as such, I modified the rest on the grinder so that I can tilt it and use my angle plate off the milling machine.
 
Good evening guys,

Thanks for encouraging me to carry on with this, I have learned so much. Number one, slow down, I am a production guy from an environment where everything is rush, rush, rush, slowing down has enabled me to enjoy this a whole lot more. I have glued on the scales, I used oak. The Oak is from the staves of 40 pint casks that I used to condition my Home Brew beer in, the aroma when working the wood was very nice, made me want a pint. :) Of course this will add even more to the story of my Neck Knife.
I hope to get it finished tomorrow.

necker5.jpg
 
Good evening guys,

Thanks for encouraging me to carry on with this, I have learned so much. Number one, slow down, I am a production guy from an environment where everything is rush, rush, rush, slowing down has enabled me to enjoy this a whole lot more. I have glued on the scales, I used oak. The Oak is from the staves of 40 pint casks that I used to condition my Home Brew beer in, the aroma when working the wood was very nice, made me want a pint. :) Of course this will add even more to the story of my Neck Knife.
I hope to get it finished tomorrow.

View attachment 2374110
Nice , but that *clamps* appears to be too small for the handle ;)
 
Some people (myself included) have been known to do that.

I know, shocking ;)
Good for you :thumbsup: Seems that I'm cursed to use jig 😂 It took me whole fifteen minutes to grind bevels on this one . 52100 , 61-62 HRC 5.5 mm on spine and now 0.20mm on edge . Wait.............. I got a phone call while I was grinding bevel on the other side......................

I know , shocking ;)

lDcZqk7.jpg

xSK83gB.jpg

JXb2AWB.jpg


My stupid jig ... . . .....so even I can make some knives o_O

8A6hIZx.jpg

Alas, I have already talked so much............. so

LqDgrU1.jpg

XBIqLs8.jpg


And this also help me ............way faster to grind in two step wide bevels and safe for thin edge not to over heat

hDWGk89.jpg

jXzMjvU.jpg

3dvtHhq.jpg
 
Last edited:
Natlek,

That is the same principle I employed but its a big old lump of cast iron. One thing I observed was that the tip of the blade flexed a bit when grinding the other side and there was no flat to pressure against, how do you overcome that?

I am going to drill a series of holes and tap them so the bolt can protrude through and support the tip, at varying lengths, ever so slightly.
One of the reason I grind in two steps is that . I use strip of micarta in finish to avoid that .................

mwwHGum.jpg


BTW , ask *free hands* how they avoid that .Maybe it's easier :)
 
Natlek,
Thanks, that is easier than my proposal. No use re-inventing the wheel. Loving the two step grind as well, gets warm going from 36 full flat. :thumbsup:

PS. Lovely blanks. :)
 
Morning Guys,

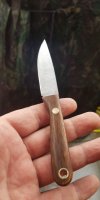
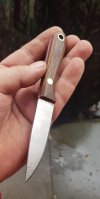
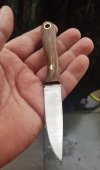
Well the nightmare is over, I didn't really want to show these pictures but I said I would so here they are. Knife #6

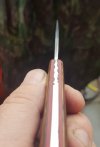
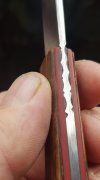
I ran into more problems on the handle, ground through the wood to the liners, started off with different thicknesses and was a problem to get back on track, my thoughts on the spine were that the human eye is connected to an ancient part of the brain that knows there are no straight lines in nature so the brain seeks to find imperfection, by introducing the grinding on the spine the brain automatically accepts it as natural and does not look to find imperfection. Although I know you guys will. :)
Overall I have a neck knife, is it perfect? No.
Am I happy? I like my design, Steel has a superb heat treat so I know it will be dependable and reliable, the fact that I picked it up off the bench as one that I had given up on also pleases me, ITs my best ever grind, fist try at filework, first try at liners but trying to get the mental images through to the finished product makes me realize I am long way from where I want to be. I am trying hard not to beat myself up and keep telling myself I am only learning.

neckerF1.jpgneckerF2.jpg


neckerF3.jpgneckerF4.jpgneckerF5.jpg
 
Good job. Glad you saw it through.

Some tips for future knives:
1) DON'T clamp hard. You only want enough pressure to hold the scales in place while the epoxy is curing. I use the weakest spring clamps I can find at HF. C-clamps are overkill. Clamping too hard can squeeze out all the resin and make a glue starved joint. A way to avoid this is to grind out a slight hollow on both sides of the tang. This makes a glue reservoir. If you want a very professional clamp, try a set of Kant-twist clamps. They aren't cheap, but solve clamping problems and allow using light clamping pressure.

2) Avoid sharp edges or pointed corners on the front of the handle. They tend to chip off easily and can feel "hot in the hand". Round off the end of the handle at the ricasso so it isn't a 90° angle. Round the bottom of the handle up into the choil or ricasso.

3) To get good strong bonds, use a high-grade resin. To get good looking resin filled areas like the file work on your spine, use a high-grade resin and epoxy dyes. I like the powdered dyes from K&G. I use System-Three or West System resin. You want a slow cure resin/hardener. Another good resin is the small jars of two-part 24-hour resin that K&G sells. If you use 5 minute or one-hour epoxy, you will get the look you have now. Mix it thoroughly, but gently and slowly, and let the mix pot sit for a while to get the air bubbles out (another advantage of a slow cure resin). Once the handle is assembled and clamped, set it aside and leave it overnight. LET IT CURE FULLY before doing any grinding. It takes a couple days to a week to fully cure epoxy. On most knives they are fine to grind the handles in 24 hours, but if you will have exposed dyed resin, let it cure for several days. Don't let the tang or handle get hot while grinding or it will affect the look and strength of the resin.
Finally, measuring the resin accurately makes a HUGE difference in the bond strength and the look. Weighing the resin to get an exact ratio is the best way. A cheap gram scale from Amazon or HF works fine. I use the little cups that are used for sauces and such in take-out places (and making Jello shooters). They hold around 2- ounces. You can buy a sleeve of 250 on Amazon for $10. If you get the ones with lids, they are also great for holding rivets, Corby bolts, and small parts on the bench.

4) Your red liners are far too thick. The purpose of a liner is to make a transition line, not be half the handle. As you found out, once you grind the outer layer the liner became much thicker looking and the joint between the oak and liner shows a lot. Part of that issue was probably in the epoxy.

5) I would have carried the file work farther down the spine. I like it to go down to about 1" before the tip. A pro-look is to decrease the size of the file work proportionately as the spine tapers toward the tip, ..... which brings up the next suggestion.

6) Distal taper. A blade that is the same thickness from ricasso to near the tip looks awkward. Distal taper makes it look sleek and pleasant to the eye.
Hi Stacy,

Thank you sincerely for going out of your way to provide constructive advice, no doubt to you they are standard operating procedures. I have read your post several times already and I will be reading it many more times and putting your advice into action in an effort to make every knife a bit better than the last.

I think it turned out great! good job!
hi Scareymcary,

thank you for your kind words.
 
Does look like a good size and shape. I'd have been tempted to use some finer grit belts on the bevel.
 
Thanks for that,

it was 600, ran it over the buffer and it looks a bit worse in picture. its a user and I wont be happy until a nice patina forms,
 
Back
Top